Creating A New Custom Form
As a Redman website owner, you can create custom forms for your website through our “RedForms: Form Builder” tool. This article will walk you through the steps of creating a new form.
In This Article
- Logging Into Your Redman Workstation
- Accessing The RedForms: Form Builder Tool
- Creating A New Custom Form
Logging Into Your Redman Workstation
In a previous article, we discussed “How To Login To Your Redman Workstation”. To gain insight on how to “login to your Redman website”, simply follow the steps here.
Accessing The RedForms: Form Builder Tool
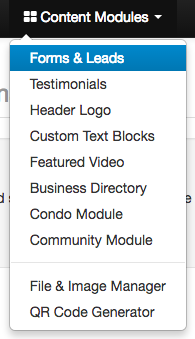
This login will take you to your “Redman Workstation” overview. In the top menu bar, you will want to select the option called “Content Modules” From the drop down menu options, you will want to choose “Forms & Leads”
Creating A New Custom Form
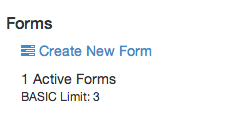
By selecting this option, you will be taken to the “Overview” page for the “RedForms: Form Builder” tool. In the right side menu bar, you will see an option called “Create New Form”. By clicking on this, you will begin the process of creating your custom form.
By clicking on this, you will start the process of creating your custom form. To place the form options you want to use, just select them on the right by clicking them with your mouse.
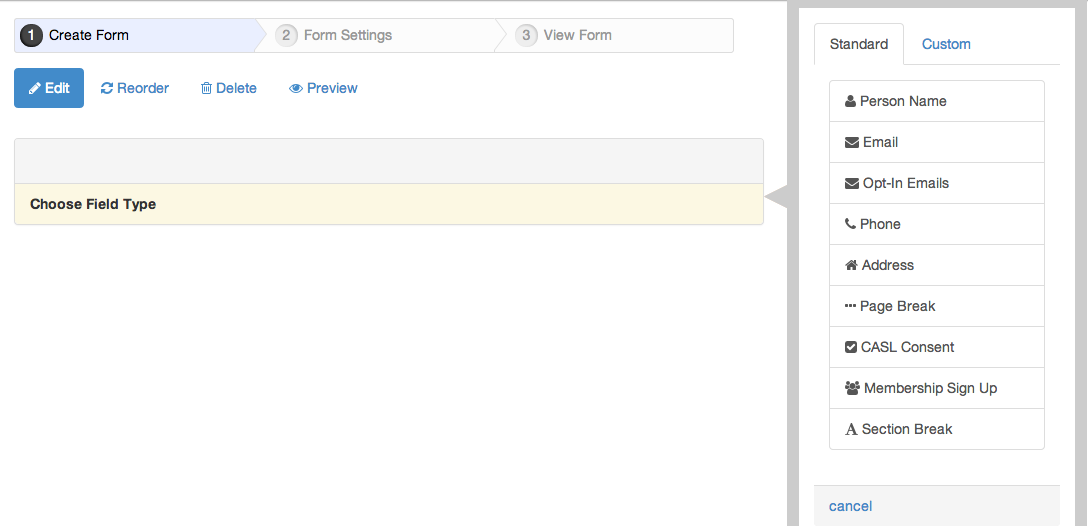
Understanding The Standard Form Options:
- “Person Name” – This field gives you the option to capture a person’s first name and last name
- “Email” – This option adds the field used to capture an individual’s email address
- “Opt-In Emails” – This field allows you to attach multiple “Autoresponders” to an e-mail. For example, if you want people to fill out their name and e-mail prior to receiving individual guides you may want to use this option. By selecting the “Opt In Emails” field, the visitor to your website can decide which reports or guides they wish to receive by email. Once the form has been submitted, these guides or reports will be automatically emailed to the visitor. Redman uses these in our “Special Reports” tool that consists of articles on buying, selling, and investing.
- “Phone” – This option adds the field to capture a person’s telephone number.
- “Address” – This adds the field to capture a person’s address that includes the street address, city, province, and postal code.
- “Page Break” – This field allows you to create a multi-step form. This type of form would allow the visitor to fill out the form in smaller steps (versus viewing and filling out a very long form on one page)
- “CASL Consent” – In an effort to assist in the Canadian Anti-Spam Legislation, we have developed a standard option that you can add to your form that asks for additional permission to contact. Please note, we recommend that you read about this legislation further to best determine how it affects your business.
- “Membership Sign-Up” – This brings in a field that allows the person to join your website as a member (can be optional). By signing up as a member for your site, a person can search and receive email notifications in regards to new listings.
- “Section Break” – This field is used to add a header and a description. “Section Break” is used to organize your fields into groups for an optimal visual appearance.
Understanding The Custom Form Options:
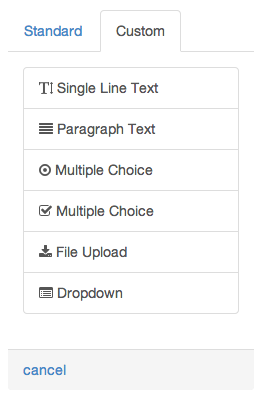
- “Single Line Text” – This brings in the field for a person to submit a single line of text. This field is used for anything in which only a single line of input is required.
- “Paragraph Text” – This brings in a field for a person to submit a more lengthy response versus a single line of text. (is there a limit?)
- “Multiple Choice – Radio Buttons” – This brings in fields for a person to select multiple choice options in a radio format. Radio buttons are used when the multiple choice options are mutually exclusive from one another. This means the user will be required to select only one choice. The first option will be used as a default selection.
- “Multiple Choice – Check Boxes” – This brings in fields for a person to select multiple choice options in a “check box” format. This type of multiple choice format is typically used when a user has the option to select 1 or many choices without affecting any. This option is also used for a single check box option in which you want a person to turn it on or off.
- “File Upload” – This brings in the field to allow the user to submit a file attachment to the form submission.
- “Dropdown” – This brings in a drop-down field for your form. This is another multiple choice format in the sense that the dropdown can contain multiple options from which the user can select one. The drop-down menu is a great way to present multiple options in a concise manner.
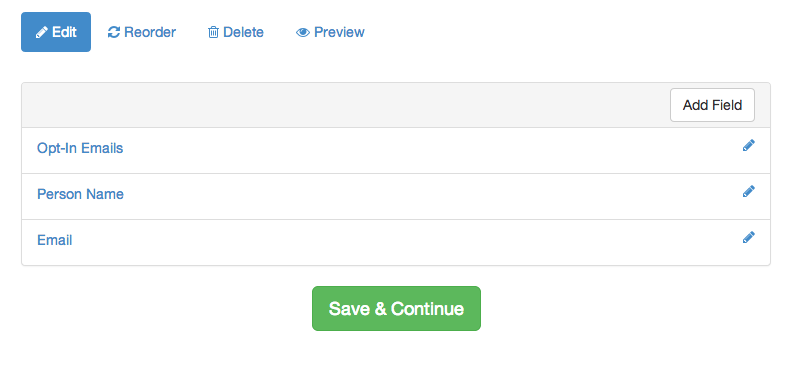
Once you have completed adding the fields to your new custom form, you will want to select the green “Save & Continue” button to go to the next step of the form builder. Alternatively, you can continue to make additional adjustments to your new custom form, including: reordering the fields, deleting the fields and previewing the form.
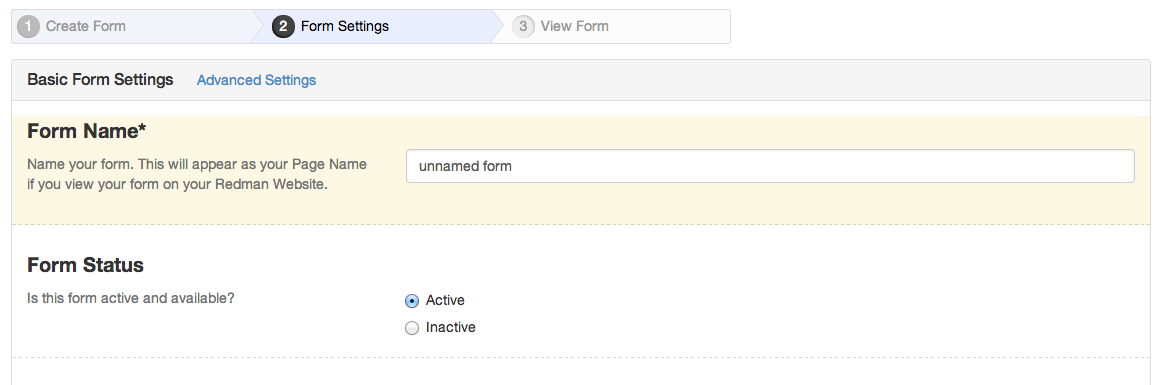
Within the form settings, you will be able to update the following:
- “Form Name” – This is where you will give your form a custom name. This will be used in your form overview section for easier organization for yourself.
- “Form Status” – In order for your form to be available on your website (or another you add it to later) it will need to be “active”. If you are no longer using the form, you can go in and mark it as “inactive”. Once it is “inactive” it will not be considered as part of your custom form limit. For Basic Websites, the custom form limit is three while on Pro Websites the custom form limit is 10. On both levels, there is an option to upgrade your Form package.
- “Email Auto Responder” – This field allows you to select if you want to send an auto-responder. This means that each time a visitor fills out your custom form, they will receive the chosen auto-respond email in their email box after they have submitted the form.
- “Thank You Message Settings” – This field allows you to choose what message the user sees once they have completed filling out the form. “Show this ‘Thank You’ message” will show an inline pop-up once the form is submitted with the “details” entered in the text box. “Redirect to another web page” is a great way to lead a person to a specific “thank-you” page related to this particular form.
- “Notification Settings” – In this field, you can decide if you want the lead notifications to be sent to your current default email notifcation group and or to go to a specific email address or set of addresses.
- Spam Protection: This field allows you to decide if you want to include “CAPTCHA” on your form or not. Note, disabling the “CAPTCHA” option, will make your form more receptive to spam emails.
- Display Settings: This field allows you to decide if you want the form titles to be justified on top of the fields or beside them.
Once you have completed updating your form settings, simply press “Save & Continue” to get to the third step of the “Form Builder”.

The third step will provide guidance and advice on connecting your form to your Redman website and/or Third Party websites.

Check out our previous articles on: “How can I add a form to my Redman Website?” or “How can I add a form to a 3rd party Website?” for further information.