Setting Your E-mail Alert Settings
As an account owner, you can set your e-mail alert settings. This means that when a person specifically contacts you through a form on your website, you can adjust where this lead information goes.
In This Article
- Logging Into Your Redman Workstation
- Updating Your “Website Specific” Alerts
- Updating Your Redman Form Alerts For All Forms
- Updating A Specific Redman Form With A Preferred E-mail Address
Logging Into Your Redman Workstation
In a previous article, we discussed “How To Login To Your Redman Workstation”. To gain insight on how to “login to your Redman website”, simply follow the steps here.
Updating Your “Website Specific” Alerts
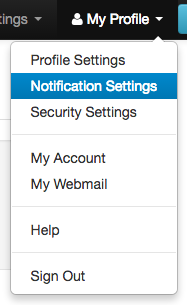
Once you’re logged into the Redman Workstation, you will want to click on “My Profile” in the top right section of the menu bar. Select “Notification Settings” from the drop down menu.
Selecting this will take you to the “Email Alerts” page of your Redman Workstation.
Notification Details:
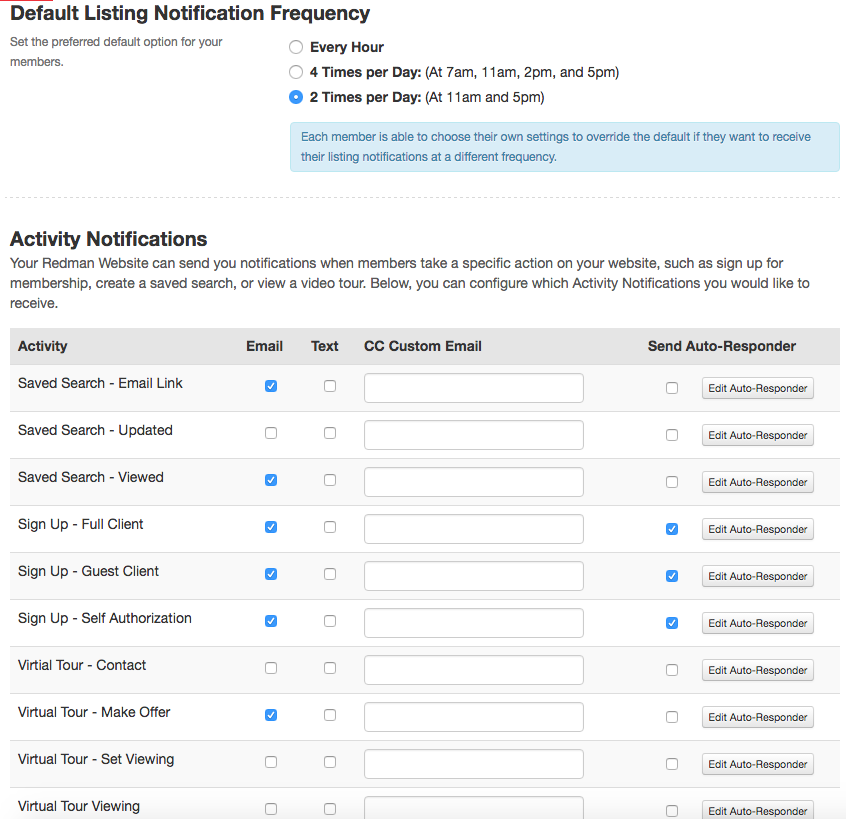
- “Default Listings Notification Frequency” – This is related to the frequency of how often your clients (website memberships) will receive new listing notifications that pertain to their “Saved Searches”. While each member can select their own frequency on a per search basis, you can determine a universal default for your website based on the options available.
Website Activity
As of July 2014, Redman has migrated most of the “Email Alert” options into our new “RedForms: Form Builder” module. That being said, the ones that are still accessible on this page, need to be managed within this page.
Types Of Activity
- “Saved Search – Updated” – By selecting this, you will be notified when your client (website member) has updated or changed their saved search. Examples of changes could include: New price range, additional neighbourhoods etc.
- “Saved Search – Viewed” – By selecting this, you will be notified when your client (website member) has actively viewed one of their saved searches.
- “Sign-Up – Full Client” – By selecting this, you will be notified when a person fills out the Full Client sign-up form. This form may also be referred to as a “VIP sign-up”. This sign-up is typically not a default on our themes, however, can be easily added to your navigation if desired on our Pro level.
- “Sign-Up – Guest Client” – By selecting this, you will be notified when a person fills out the Guest member (Guest client) form. This specific “sign-up” can also be tied to all forms with the Redman platform. By default, this is the primary membership form Redman uses on all our website solutions.
- “Sign-Up – Self Authorization” – By selecting this, you will be notified when the guest member has activated their membership. When a person fills out the “guest client” form, they are sent an e-mail with an authorization code in it. Once this code is clicked, this e-mail will be sent to notify you that they have now been authorized.
You can decide if you wish to be notified by Text (SMS message) and/or e-mail by “checking” off the preferred box. There is also an option to create a “Custom Auto-Responder” by clicking “Edit” beside each “website activity”. By creating a custom auto-responder, a custom e-mail will be sent after the form is completed by the visitor. Once your changes are completed, be sure to press “Submit” to save them.
Updating Your Redman Form Alerts For All Forms
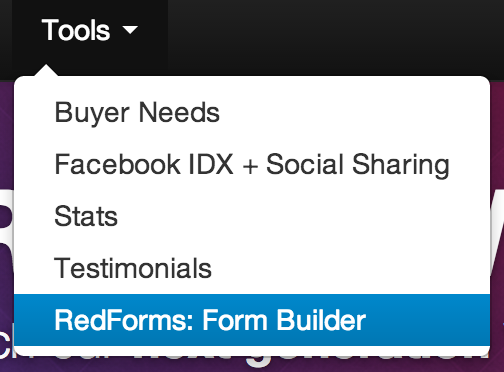
The “RedForms: Redman Form Builder” is the primary tool you will now be using to update your “Notification” settings for e-mails. To access this section of your website, go to “Tools” in the top bar of the navigation and select “RedForms: Form Builder”.
From here, you will be directed to the overview page of RedForms. In the right side bar, you will see an option titled “Notification Settings” and “Manage Notifications”.

Once selected, you will be taken to a page where you can edit and modify where your “Default Notifications” can go. Once you have added the new e-mail you wish to receive these notifications at, simply press the “save” button. Note: Your leads can be sent to multiple addresses. This can be done by adding a comma in between the e-mail addresses being used.

Updating A Specific Redman Form With A Preferred E-mail Address
Once you are in the “RedForm: Form Builders” main page, you will want to scroll and find the specific form in which you want to update your e-mail notification settings.
![]()
From here, you will notice that there are buttons with icons on the right-hand side. These icons mean the following:
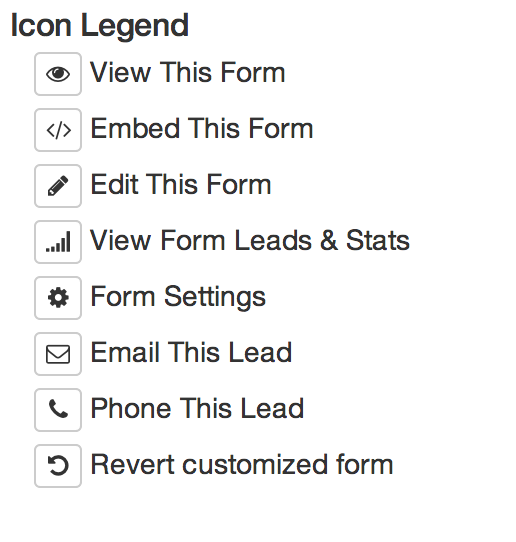
Based on this you will want to click on the “circular” icon that is for “Form Settings”. Once this is selected, you will be taken to the page where you can make additional changes to your form settings including updating where the e-mail notifications go for this form in particular.
Scroll down to find the section called “Notification Settings”.

By selecting “To an email address”, you will be able to adjust where this form’s email notifications go.
Note: Your leads can be sent to multiple addresses. This can be done by adding a comma in between the e-mail addresses being used.

Once you have completed updating your settings, be sure to select “save” at the bottom of the page. Any time you change your settings, it is recommended to send yourself a test e-mail to confirm that the settings have been correctly entered.