Creating An AutoResponder For A Form
As a Redman user, you have the ability to create an AutoResponder for your Redman Forms. By following the article below you will learn how to accomplish this.
In This Article
- Logging In & Creating A New Form
- Understanding What An AutoResponder Is
- Creating An AutoResponder
- Connecting The AutoResponder To A Specific Form
Logging In & Creating A New Form
In a previous article, we discussed “How To Login & Create A New Custom Form”. To gain insight on how to do this, simply follow the steps here.
Understanding What An AutoResponder Is
An AutoResponder is basically an email that is sent to a visitor automatically. In the specific case of the Redman Forms, it is an email automatically sent after a visitor has filled out a specific form on your website. Once the form is submitted, an email will be sent out automatically to the visitor through the creation of an AutoResponder.
Creating An AutoResponder
Once you are in the “RedForms: Form Builder”, you will want to select the option called “Manage Responders” from the right-hand navigation bar.
After this link is clicked you will be taken to a page where all your current AutoResponders exist (many of the ones viewable here are used in the Stock Form: Special Reports). To add a new AutoResponder, simply click the button at the top of the page titled “Create New Email Responder”.
From here, you will be able to begin by adding the following items:
- Title on the email responder – this is for your personal reference, recipients do not see this information
- Subject – this is what will appear in the person’s inbox when they receive it
- Body – what will be read in the email
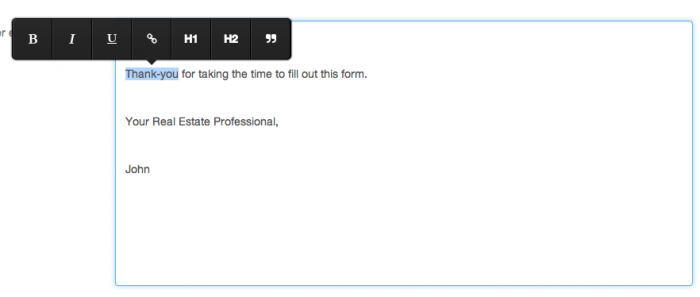
To edit the format of the body, simply highlight the text you wish to edit. Once highlighted “Tool Options” will be visible.
Once you are done editing your AutoResponder you will want to press “Save”. Once your AutoResponder has been saved it should show as the last AutoResponder in the list. Now you are ready to connect it to your desired form.
Note: You will be taken back to the overview page with all responders, your new AutoResponder will be found at the bottom of the list.
Connecting The AutoResponder To A Specific Form
To get back to the “RedForms: Form Builder” tool overview, you will want to select “Go Back” from the Responder overview page.
In order to connect the AutoResponder to a specific form response, select the gear icon for the selected form. The gear icon will show the label “Form Settings” when hovering on the icon.
This will take you to the “Form Settings” options for this specific form. In this page, you will want to go to the section titled “Email Auto Responder” and click on the AutoResponder(s) you wish to connect to this form.
Once you have completed this step, simply press the “Save” button at the bottom of the page.
Congrats, you have now successfully created and connected your very own AutoResponder!


