Understanding Your Form Settings
As a Redman user, you will want to take the time to learn about all the helpful settings available to you for your forms. This can be done accessing the Form Settings for a specific form.
In This Article
How To Access The Form Settings
Once you are in the “RedForms: Form Builder” tool overview, you will want to navigate to the form that you want to update the “Form Settings” on by selecting the gear button that when hovered over displays “Form Settings”
The “Form Settings” page has numerous options to choose from, which is why we will go one by one to ensure that you obtain a good grasp of all the setting options.
Basic Form Settings – Form Name
This is where you will give your form a custom name. This will be used in your form overview section for easier organization for yourself. Simply type in the box to create a unique form name or to edit the existing text.
Basic Form Settings – Form Status
In order for your form to be publicly available on your website it is required to be “active”. If you are no longer using the form you can go in and mark it as“inactive”. Once it is “inactive” it will not be considered as part of your custom form limit. For Basic Websites, the custom form limit is 3, while, on Pro Websites, the custom form limit is 10. On both levels, there is an option to upgrade your Form package.
Basic Form Settings – Email AutoResponder
This field allows you to select if you want to send an auto responder. This means that each time a visitor fills out your custom form, they will receive the chosen autoresponder in their email box after they have submitted the form.
Basic Form Settings – Thank You Message Settings
This field allows you to choose what message the user sees once they have completed filling out the form. “Show this ‘Thank You’ Message” will show an inline pop-up once the form is submitted with the “details” entered in the text box. “Redirect to another web page” is a great way to lead a person to a specific “thank-you” page related to this particular form.
Inline Pop-Up Option:
Thank-You Specific Page:
Basic Form Settings – Notification Settings
In this field, you can decide if you want the lead notifications to be sent to your current default email alert settings and/or if you wish this form to go to a specific email address or set of addresses. Multiple addresses are separated by a comma and a space, for example “emails@one.com, emails@two.com”.
Default Notification:
Notification To A New Email:
Basic Form Settings – Spam Protection
This field allows you to decide if you want to include“CAPTCHA” on your form or not. Note, if you select to exclude using a “CAPTCHA” on your selected form, you will be more receptive to spam emails.
Basic Form Settings – Display Settings
This field allows you to decide if you want the form titles to be justified on top of the fields or beside them.
Once you have completed updating your form settings, simply press the green “Save” button.
Advanced Settings
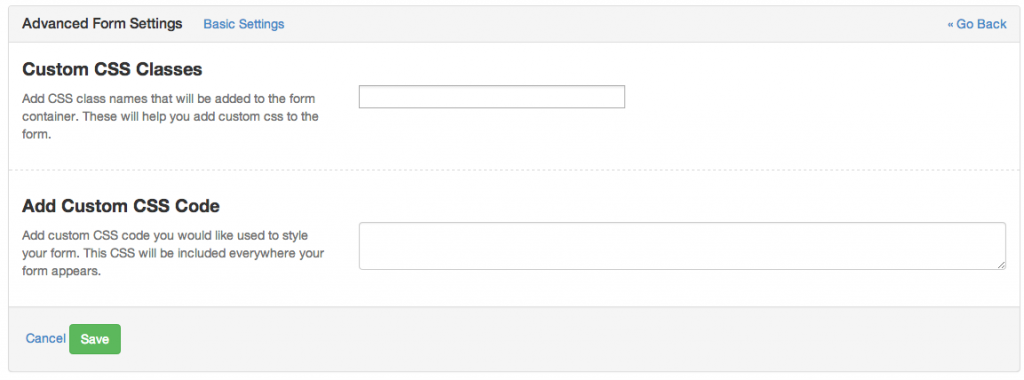
For advanced users, there are additional settings you have the option to use in our “Form Settings”. These Advanced Settings are more specifically available for people who have a good understanding of how to edit CSS. We are typically speaking about people who are Web Designers or Developers. If you have no ideas “what CSS is”, we do not recommend editing your Advanced Settings.
To access the advanced settings, simply select “Advanced Settings” at the top of the page.
Once selected, you will be taken to the Advanced settings page.
Once you have added your “Custom CSS Classes” they will be added to the RedForm: Form Builder wrapper. If you would like to add “Custom CCS Code” to be added to your form, you have the ability to add it here. It will be added to your website with your form. These “Advanced Settings” will apply to both your Redman website and any third party website you add the form to.


