Adding a Sold Property to Your Website
Adding a sold listing to your site can be an awesome way to show your prowess as a realtor. Follow the steps below to get started adding sold listings to your site.
In This Article
- Logging into Your Redman Workstation
- Adding an Exclusive Sold Listing
- Adding Images to Your Listing
- Adding a Sold Listing From MLS
- Removing and Editing a Sold Listing
Logging Into The Redman Workstation
In a previous article, we discussed “How To Login To Your Redman Workstation”. To gain insight on how to “login to your Redman website”, simply follow the steps here.
Adding an Exclusive Sold Listing
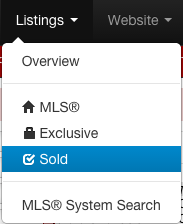
Once you have logged into your Redman Workstation, select “Listings” from the black navigation bar. This will give you a drop down menu, select “Sold” from that drop down.
Selecting “Sold” will bring you to the Sold Listings page on your site. From the menu located on the left side of the list of active solds, select “Add a Sold”
This will give you a form, called “Listing Information” to fill out with all the information you could add to your Exclusive Sold Listing.
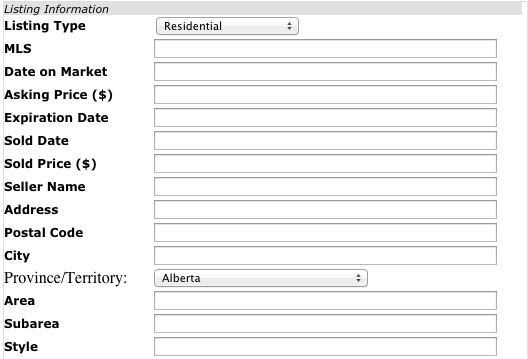
The form is fairly long and you may have to scroll to fill it out in it’s entirety. To review what is required on the form, check out our previous Knowledgebase article Select the grey “Submit” button at the bottom right when you are finished to save the filled out listing.
Adding Images to Your Listing
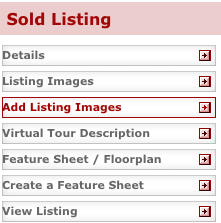
To add photos, navigate to your listing and select “Edit”. Select from the menu titled “Sold Listing” on the left of the form “Add Listing Images” .
Here, you can choose files from your computer or website to add to the listing by selecting the grey “Choose File” button.
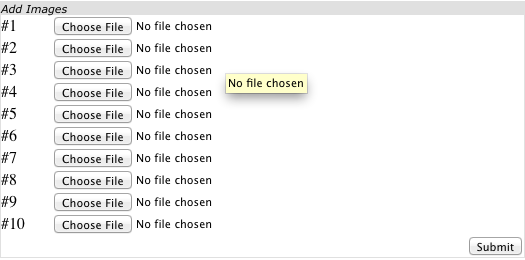
The system will only allow you to add 10 images at a time, just select the grey “Submit” button to add the images, then you will be able to add 10 more.
Adding a Sold Listing From MLS
Once a listing has been taken down from the MLS data base as a current listing, our system doesn’t know why it was removed, so it places all of the expired listings in one place.
From your Redman Workstation, select the “Listings” option along the black navigation bar and then select “Sold” from drop down menu.
This will bring you to the “Sold Listings” page. Select the “Inactive” link on the right.
![]()
This will bring you to a list of all your inactive sold listings. These are listings that were previously active on your site and visible to the public. This list is not visible to users, only to you.If a listing is sold, then removed from the feed, we keep that listing in a temporal table for 90 days. If the listing is not set to “Enabled” as outlined below, it will be removed from the inactive list completely.
To add a listing to the “Active” sold listings page, find the listing you wish to add on the list. Once found, select “Enable” from the list of options on the right of the listing details.

Selecting “Enable” will instantly make the listing live on your site.
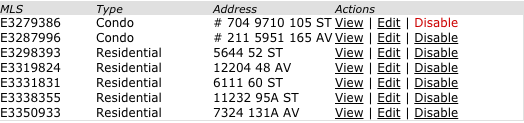
Removing and Editing a Sold Listing
To remove a sold listing from being seen on your site, go to the “Sold Listings” page. Here, you will see a list of “Active” sold listings. Select “Disable” from the options to the right of the sold listing details you wish to be removed.
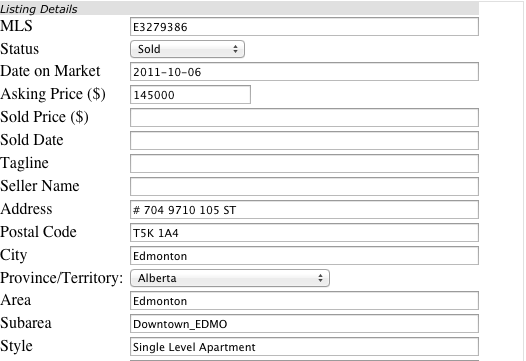
To edit a sold listing, from your “Sold Listings” page, you can see a list of “Active” sold listings. Select “Edit” to the right of the sold listing details you wish to edit.

This will bring you to the “Listing Details” form where you can edit what you would like site users to be able to see.
When you have finished editing, select the grey “Submit” button at the bottom right under the form.