How to Set Your Vacation Email Message
Setting up a vacation email message lets your clients know you are away and are unable to return their emails.
In This Article
Logging Into Your Redman Webmail
In a previous article, we discussed “How to log into your Redman Webmail account”. Review how to do that here
Setting Your Vacation Message
Once logged into your Redman Webmail account, select the “Settings” option in the top right-hand corner. It looks like a light switch.
![]()
Once selected, it will give you a few options in tabs along the top of the window. Select “Filters”
![]()
This will allow you to select from the “Filter sets” menu on the left-hand side of the screen. Select “managesieve”
![]()
This will give you a new “Filters” menu just to the left of the “Filter sets” menu where you can select the first menu option “Vacation”

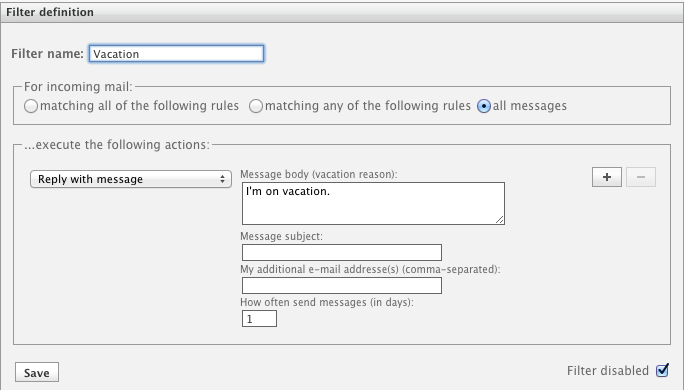
Once you select “Vacation” you will be able to set up your vacation message within the “Filter definition” window that appears to the right of the “Filter” menus.

Filter name: This is what the filter will be labelled as for you to find in the future
For incoming mail: You have the option to select which messages get your vacation reply by selecting one of the three options
- matching all of the following rules
- matching any of the following rules
- all messages
Execute the following actions: This is where you will set how emails will be responded to while you are away.
Select “reply with message” to send an automatic email to the senders you have selected.
Here you can fill out:
- Message body (vacation reason): This is what will appear as your email message.
- Message Subject: This will appear in the subject line of the email.
- My additional email address(es) (separated by a comma): This will send an email to any additional recipients that you would wish the vacation reply be sent to. Typically you will want to leave this box blank.
Next, fill out “how often to send message (in days)” white text box. This sets the message to send out for the given amount of days.
Example: if you are gone for a week, set this number to 7 to reflect being away for 7 days.
To enable this feature, you must select the “Filter disabled” checked box on the bottom right of the window.
![]()
Having it checked, disables the filter, unchecking it enables the filter.
![]()
Once you have unchecked this box on the right of the screen, select the grey “Save” button on the bottom left.
You have successfully created a vacation auto respond email!
