Changing Your Header Logo
Adding a header logo to your website is a great way to capture your unique brand on your website. Follow the steps below to learn how to update your custom logo.
Note: Using this feature is exclusively available to select Pro level clients. If you would like to add a header logo to your website and are not able to complete adding your header logo after following the steps in our article below, contact our Sales Team.
In This Article
Logging Into The Redman Workstation
In a previous article, we discussed “How To Login To Your Redman Workstation”. To gain insight on how to “login to your Redman website”, simply follow the steps here.
Updating Your Header Logo
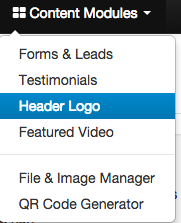
Once you have logged into your Redman Workstation, select “Content Modules” from the black navigation bar, and then select “Header Logo” from the drop down menu.

Once in the Header Logo area, you can add an image from your computer by selecting the blue “Upload new logo” button.
![]()
Once the new logo has been uploaded, you will receive a green You Were Successful notification.

You can also remove the image from your site by selecting the red “Disable custom logo” button.
![]()
On your pro level theme, your custom logo will usually appear in the top left corner of your website homepage.
