Managing Contacts/Sub-Accounts on My.Redmantech.ca
Create and Manage Contacts or Sub-Accounts to access My.Redmantech.ca for your Invoicing, Product and Support details.
In This Article
- What is a Contact
- The Difference Between Contacts and Sub Accounts
- Navigating to the Add a New Contact/Sub Account Page
- Creating a New Contact
- Creating a Sub-Account
What is a Contact
My.Redmantech.ca allows you to create alternate Contacts or Sub-Accounts for your Support, Products and Invoicing details. These Contacts or Sub-Accounts can be set to receive different levels of access and communication for numerous information and product options/updates available to you through the site to better manage your business effectively.
A Contact does not have direct access to My.Redmantech.ca, but can receive and send communications from Redman Technologies.
The Difference Between Contacts and Sub Accounts
Support contacts do not receive copies of all support tickets. Contacts can open support tickets themselves via email and will only receive emails when Redman Support replies to a ticket they opened.
A Billing Contact is used where the name/address an invoice should be sent to differs from the main account and/or the name/address of the card holder that will be paying the invoice is different. This is set up in the profile for the account holder under Default Billing Contact after the contact has been created.
Sub-Accounts allow clients to create sub-users under their main account, which then allows that contact to login, and carry out various actions that the main account holder has permitted them to.
Navigating to the Add a New Contact/Sub Account Page
First, log into your my.redmantech.ca account
On the homepage of your My.Redmantech.ca account, select the Hello, Your Name! drop down menu on the black access bar.

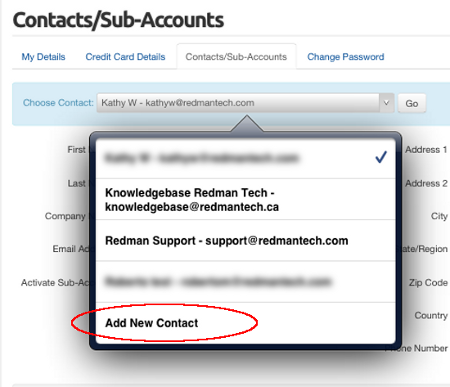
Select the Contacts/Sub-Accounts option from the drop down menu. Once selected, and select Add New Contact. Fill in the Name, Company Name, Address and Contact Information as requested, along with the Email Address the Contact will use as Login information.
It is important to also set how much information the Contact/Sub-contact will receive from My.Redmantech.ca. To do this simply check off the boxes marked with the communication areas the Contact/Sub-contact will be responsible for.

Creating a New Contact
Note: If Save Changes is selected at this point without clicking the Activate Sub-Account box, the Individual will remain a Contact and have no access or ability to change or edit My.Redmantech.ca. They will be able to receive communications from us through the Email Preferences you select.

Finally, it is essential that you Save Changes by clicking on the blue “Save Changes” button at the bottom of the screen.

When successful a green bar stating your Changes Saved Successfully! will appear at the top of the screen.

Congratulations, we now have an additional contact authorized to speak towards your needs. Now, to make them do the work FOR you, we want to create a Sub-Account!
Creating a Sub-Account
Unlike a Contact, a Sub-Account has their own access to My.Redmantech.ca that is conected to your account, yet may not have the same level of access you have. The level of access is entirely dependant upon what you allow them to have through Sub-Account Permissions.
To create a Sub-Account follow the navigation steps above and check the Tick to configure as a sub-account with client area access box.
Once this is done, areas to create passwords and permissions become visible. If this box is not selected the individual will remain a Contact without any access to the My.Redmantech.ca system on their own.
Start by creating a temporary password for the Sub-Account by typing it into the field provided and then retyping it again into the Confirm Password field below.
The strength of the password is also measured for you as you type, allowing you to build a Strong password that is more difficult to guess and creating greater protection for the information in your account. It is always advisable to have a password that is at a minimum of 6 characters long, and containing at least 1 number, 1 lowercase and 1 capitalized letter – including some for of punctuation will make a password much stronger. A password will be measured as Weak, Moderate or Strong.
The different Sub-Account Permissions allow you to give the multiple individuals as much or as little access as you desire through the ability to have multiple accounts for different people with different responsibilities:

To finalize these details ensure that you Save Changes by clicking on the blue “Save Changes” button at the bottom of the screen.
When successful a green bar stating your Changes Saved Successfully! will appear at the top of the screen.
Congratulations, you have successfully passed your work on to someone else! Enjoy your free time.